

Choose a single-door electrical enclosure when one leaf can open far enough for the work and the equipment fits through the clear opening. Choose double doors when a wide front needs shorter individual leaves, then check what remains between them. A fixed center post can block a mounting plate or large component even with both doors open. If that equipment needs a full-width removal route, specify an approved removable-post or unobstructed-opening design. Confirm sealing and interlock requirements on the chosen configuration.
This comparison covers two side-by-side doors on one enclosure, rather than front and rear doors or two separate cabinets.

Compare the opening behind the doors
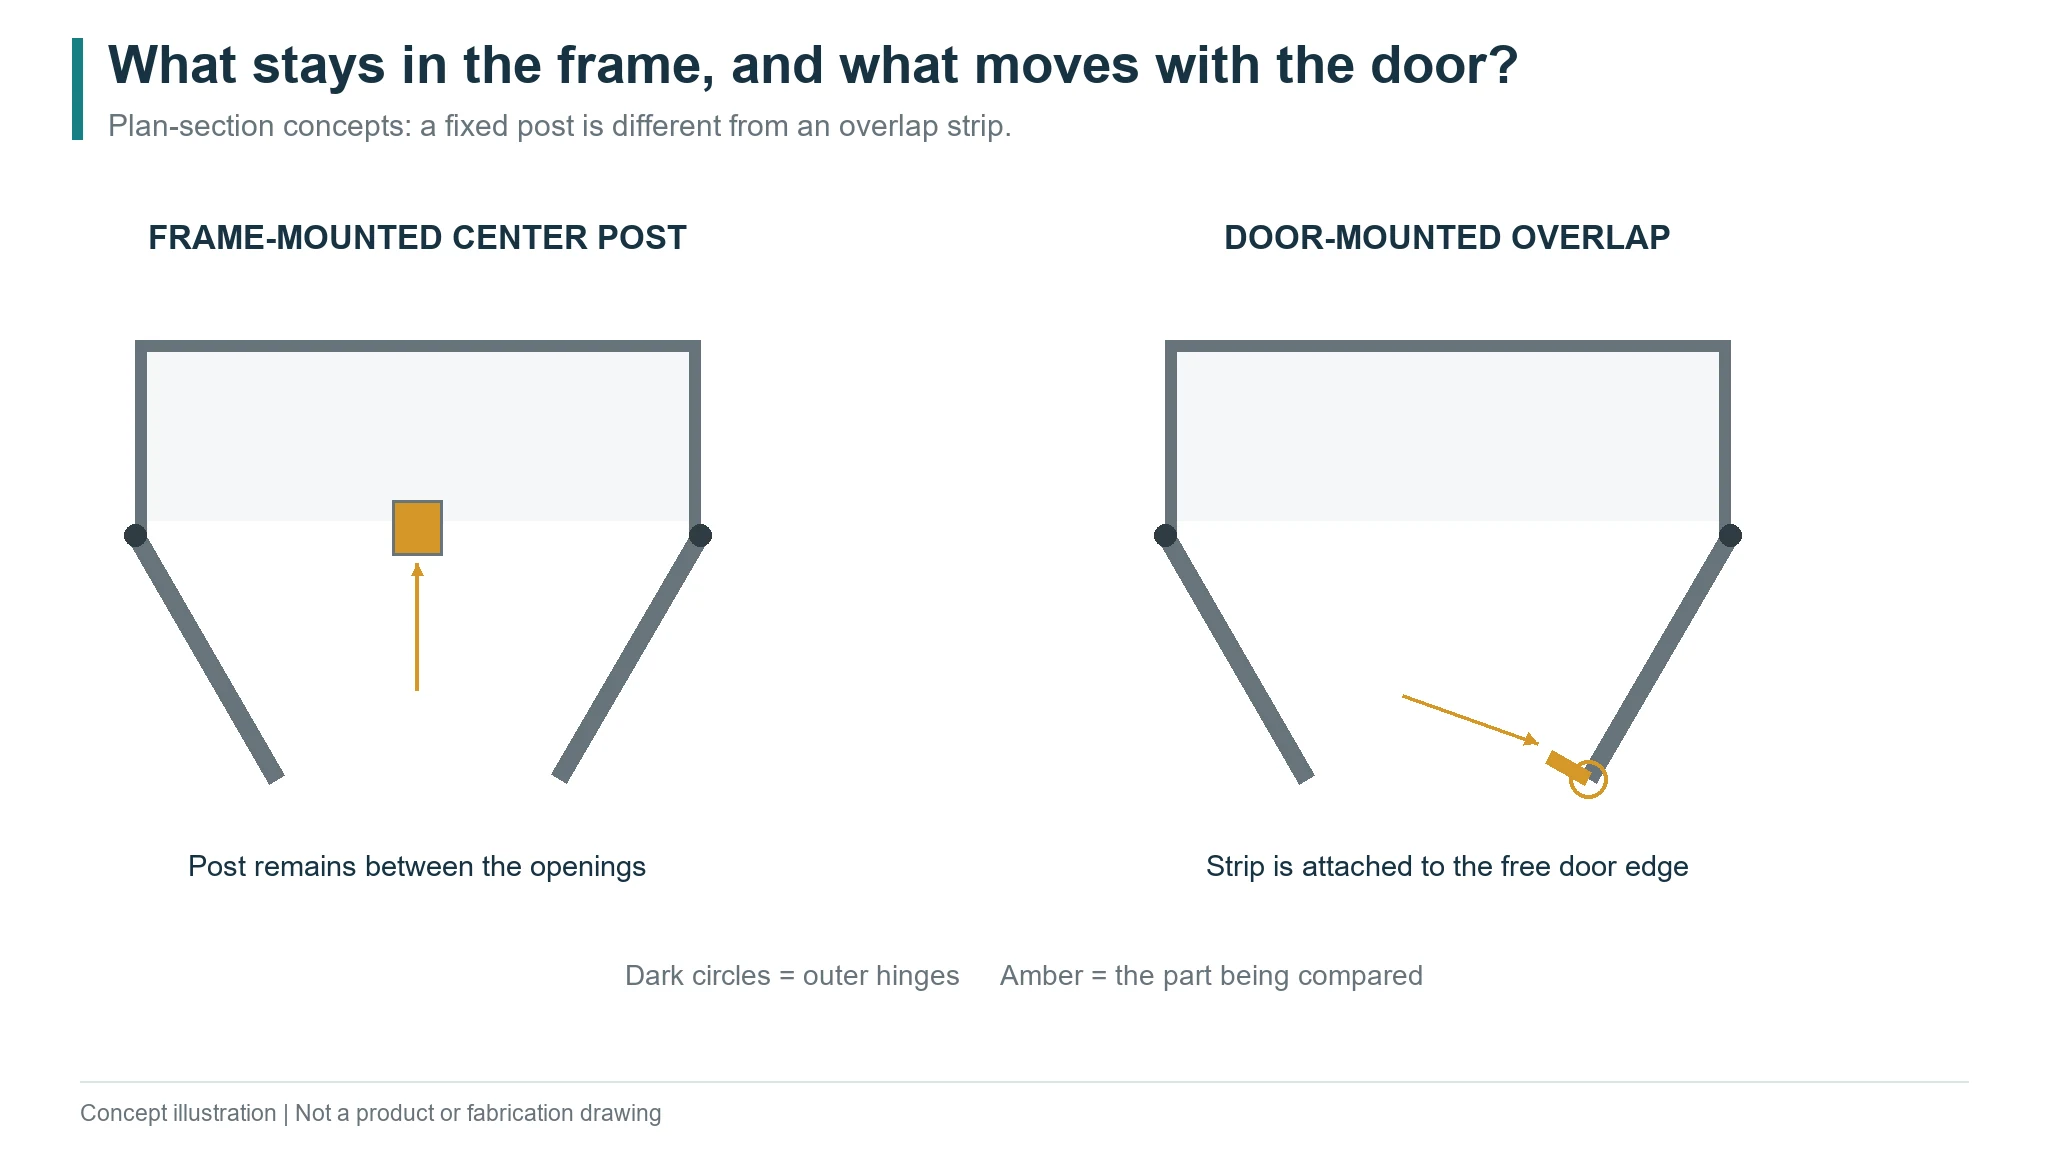
Ask for a front view with the doors open. It should show the frame, center members, hinges and locking hardware that remain in the opening. Use that drawing to distinguish these arrangements:
| Door arrangement | Access available | When to consider it | Check before ordering |
|---|---|---|---|
| Single door | One front opening once the leaf clears the working area | The door swing and clear opening suit installation and maintenance | Actual opening angle, clear width and height, and loaded door weight |
| Double doors with a fixed center post | Two openings separated by a member that stays in place | Every required installation and replacement task works through those openings or another approved access route | Clear width on each side and any obstruction to tools or equipment |
| Double doors with a removable center post | A wider route after the post is removed as designed | Wide equipment occasionally needs to pass through the front | Post-removal procedure, remaining obstructions and refitting requirements |
| Overlapping double doors with no fixed center obstruction | An opening across the front when both leaves are clear | Full-width front access is needed without removing a separate post | The overlap detail, closure sequence and actual clear dimensions |

Rittal’s VX Hybrid combines a full-width mounting panel with a removable center mullion. nVent’s specified CONCEPT two-door enclosure uses overlapping doors to provide full-width access. These are different ways to provide a wide access route.
A center post, also called a center mullion, is the member between the doors. An overlap strip attached to a door moves with that leaf; it should not be mistaken for a fixed post. Have the supplier identify which parts stay in the opening, which move with a door and which can be removed.
Check the largest item you need to remove
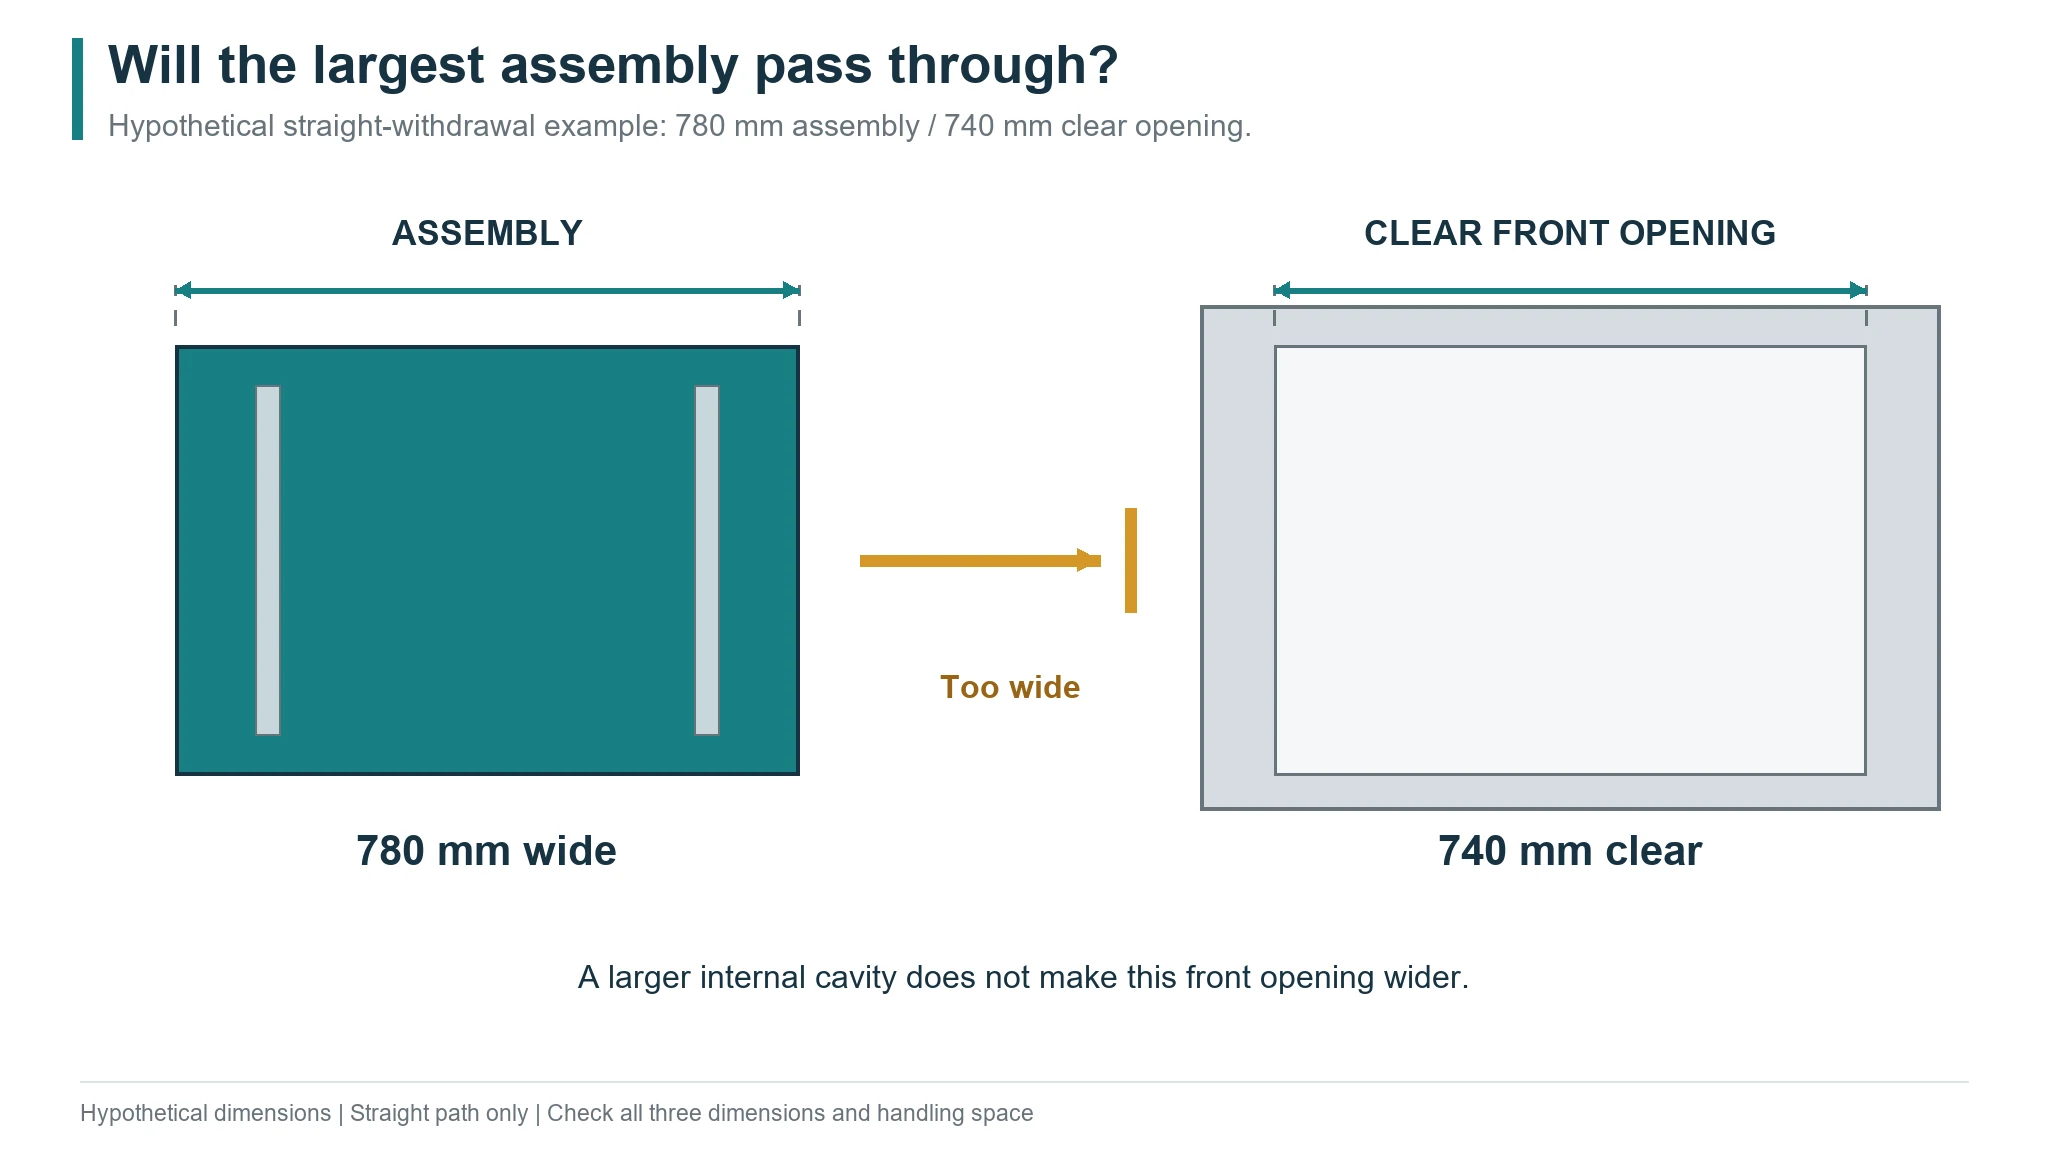
Record the external dimensions, usable internal space and clear front opening separately. The first two tell you where the cabinet fits and what it can contain. The third describes the route available through the front in the specified door position.

Mark the largest replaceable item on the layout. That might be a populated mounting plate, a drive on its bracket or a subassembly with projecting connectors. Use its complete removal outline, including anything that stays attached during handling.
Ask for clear width and height in two conditions:
- Routine access: the permitted doors are open to the angle available on site, with the center post and normal hardware in place.
- Major replacement: any approved removable doors or center members are taken off, with the remaining obstructions shown.

For a hypothetical example, a 780 mm-wide assembly that must be withdrawn straight through a 740 mm opening will not pass, even if the enclosure has enough internal room to hold it. Change the opening or agree on a different removal method before approving the layout. Include the space outside the cabinet needed to support and move the assembly.
Removable doors can help during assembly. In Rittal’s published Schaper application, staff remove the doors before assembly and wiring, particularly when laying cables across multiple enclosures. For your installation, check whether door removal will still be practical after controls, wiring and protective bonding connections have been fitted.

If the center post must come out, request its removal and refitting procedure. Identify attached locks, seals or other hardware, and confirm the required isolation and handling arrangements. Specify a removable design at the quotation stage rather than expecting a fixed post to be cut away later.
Draw the door swing at the installation site
Splitting a wide front into narrower leaves reduces each leaf’s basic swing radius. That can help in a restricted aisle, but the useful space depends on the actual door widths, hinge positions and nearby obstructions.
Put the enclosure into a plan view of the installation. Draw both leaves through their required opening angles, including projecting handles and door-mounted controls. Then add the technician’s working position and the route for withdrawing equipment. A door that misses the opposite wall can still leave too little room to work beside it.

For a wall-mounted electrical enclosure, include the side wall, machine frame and any neighboring cabinets. Check whether those obstacles prevent a door from opening far enough or being lifted off. Keep the door-swing check separate from the applicable electrical working-space requirements.
Compare the actual loaded leaves as well. If one door carries an HMI, reinforcement and other accessories, do not assume that dividing the front into two doors halves the hinge load. The hinged enclosure cover guide covers hinge selection, door-mounted equipment and wiring movement in more detail.
Confirm the opening and closing sequence
An overlapping double-door design may require one leaf to close first so the other can seat against it. A mechanical interlock can impose additional rules. Specify both functions on the drawing rather than relying on a note such as “left door first.”
Two nVent systems illustrate why the sequence needs checking:
- In the CPX/X stainless steel disconnect enclosures covered by specification 00384, the primary door must open before the secondary door, but the doors can close in either order.
- In nVent’s FMA01 actuator system, the primary door cannot close until all secondary doors have closed.
These are instructions for different systems. Neither establishes a rule for every double-door enclosure.

For the proposed cabinet, have the supplier identify the primary and secondary doors, if applicable, and record which door opens first, which closes first and how the center seal seats. Confirm the sequence with the selected handles, locking rods and interlock installed. Do not try to make a conflicting sequence work by forcing a door or bypassing the interlock.
If separate electrical compartments are needed, show the protective barriers and isolation arrangement on the design as well; two outer doors do not establish that separation.
Follow the seal through the center joint
Ask for a section through the meeting edges of the two doors. Where a post provides the sealing surfaces, inspect both door-to-post interfaces. Where one leaf provides the contact surface for the other, inspect that overlap instead. Follow the joint to its top and bottom, where it meets the perimeter seal.

EMKA’s control-cabinet guidance treats locks, hinges and seals as interacting parts. It describes how distributed locking points pull a door into its seal, and how sealing profiles accommodate manufacturing tolerances.
For the proposed design, check where each latch applies pressure, how the hinge side is positioned and whether the center joint seats without trapping a cable or forcing a door. Include the gasket’s specified compression range and the door and frame tolerances in that review.

Request protection documentation for the quoted configuration, including its doors, cable entries and other openings. Use that evidence to assess the required IP or NEMA Type designation; door count alone is not an adequate basis for choosing the protection level.
Specify the access arrangement before requesting a quote
A useful custom electrical enclosure brief includes a closed front view, an open-door view and a plan of the installation space. Add a center-joint section when the sealing arrangement is not clear from those views.

Alongside material, finish, quantity and drawing revision, record:
- The largest assembly to install or replace, including its complete dimensions, weight and intended handling direction.
- The required clear opening for routine work and for major replacement.
- The center-post arrangement and any approved door or post removal needed to obtain that opening.
- Available door angles, nearby obstacles and equipment mounted on each leaf.
- Opening and closing order, locking hardware and any required interlock.
- The installation environment, requested protection level and evidence required for the finished configuration.
- What the supplier provides: enclosure body, mounting plate and hardware, with electrical assembly, testing and site work identified separately.
Compare quotations against this same access specification. Two cabinets with the same external dimensions can offer different replacement routes, and a removable-post option needs to be included in the quoted configuration.
For larger cabinets, review modular enclosure access layouts against the same opening and removal requirements.
For a new or crowded layout, agree on a fit check before batch approval. Use the intended hardware and a representative assembly, or an agreed dimensional fixture, to check the access route. Confirm that any removed parts can be refitted and the doors close in the specified order. This checks fit and operation; it does not replace a required protection test.
Send FN your layout with the largest removable assembly marked, the proposed door arrangement and the available site clearances. Note any dimensions or requirements that still need a decision. Request an enclosure quotation with your drawing or sketch.
FAQ
When should I choose a single-door or double-door electrical enclosure?
Choose a single door when its swing and clear opening suit the installation and maintenance tasks. Consider double doors when a wide front needs shorter individual leaves, then check whether a center post obstructs equipment replacement. Door count alone does not tell you how much usable access you will have.
Do two open doors always provide full-width access?
No. A fixed center post still divides the opening when both doors are open. Ask for an open-door drawing showing the clear width, height and remaining hardware. Full-width access requires a suitable unobstructed-opening arrangement or an approved removable-post design.
Can I remove the center post to replace a mounting plate?
Only if the quoted design permits it. Request the removal and refitting procedure, including any attached locks or seals and the required isolation and handling arrangements. Do not treat a fixed post as removable or plan to cut it out later.
How can I check whether a large component will fit through the opening?
Compare the complete removal outline, including brackets and connectors that stay attached, with the clear opening at the door angle available on site. Check the withdrawal path and handling space outside the cabinet too. Internal cabinet width is not a substitute for this check.
Must the secondary door always close before the primary door?
No. The sequence depends on the overlap, locks and interlock system. The nVent CPX/X specification discussed above allows either closing order, while its FMA01 actuator system requires the secondary doors to close first. Confirm the instructions for the actual configuration.
Does a single-door enclosure seal better than a double-door enclosure?
Door count alone does not establish sealing performance or an IP or NEMA Type designation. Review the gasket contact surfaces, latch pressure, hinge position and tolerances. For double doors, also trace the center joint to the top and bottom perimeter seals, and request protection documentation for the quoted configuration.
What drawings should I send with an enclosure quotation request?
Send a closed front view, an open-door view and a plan showing site clearances. Mark the largest assembly to install or replace, its handling direction, the required clear opening and the center-post arrangement. Add a center-joint section if needed, plus material, finish, quantity, environment and the requested protection level.